

Welcome to Part 2 in a series of blogs on how to make mass changes and additions to data in Dynamics NAV. If you missed Part 1, you can read it here.
In this blog we will look at the first two of 10 steps in making a mass change or addition to data in NAV, specifically:
- Identify what you want to change or add to NAV, including which fields and tables are involved. a.) For changes to existing records, create a mapping table to identify under what circumstances certain records will get updated. b.) For new records, identify all the fields that need to be set up to add in the new data.
- Go into RapidStart and create your configuration package and download the tables and fields identified. Export this to Excel.
Let’s get started!
Step 1
For this example, let’s say you want to modify the Cash Flow Payment Terms field so that all Customers who are NET 15 days in reality are NET 30 days for cash flow forecasting purposes.
Step 2
In NAV go to the search box in the upper right corner, type “Config” and select the last item in the list Configuration Packages:
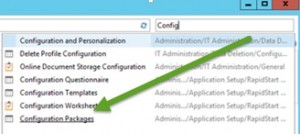
This can also be found under /Departments/Administration/Application Setup/RapidStart Services for Microsoft Dynamics NAV/Configuration Packages
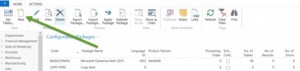
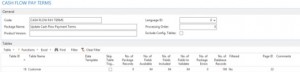
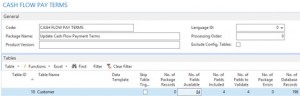
Once on the Configuration Packages page in NAV, create a specific Configuration Package to get the Customer table in NAV by selecting “New.”
Now you will see something like this:
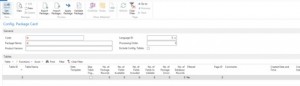
Please enter in a short name and description in the Code and Package Name fields. The remaining fields under General can remain unchanged or blank.
Under Tables, hover your mouse over the “0” under Table ID until it looks like this:

Click on the drop down and a list of Objects will pop up (image below). These objects are the tables of data within NAV.
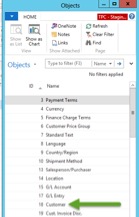
Then select the table with which you want to work. For our example, please select “18 Customer.” If the exact table number is already known, then you can manually enter the table number in where the zero was. In this case, typing “18” where the zero was would provide the same table.
Regardless of which method is used to add a table, click on “Refresh” in the Home Ribbon. That will update the whole screen to look like this:
We now have our table. However, we are currently including all the available fields of the table, and we do not need all of them for our purposes. From the selected table we need Customer Number, Name, Payment Terms and Cash Flow Payment Terms. To select these fields, go to the No. of Fields Available value and hover the mouse there until the number is underlined. Once it is underlined, click on the number.
Clicking the underlined number will bring up the following pop-up box (see below). Once the box pops up, please click on “Clear Included.” This will uncheck almost all of the boxes under the Include Field column.
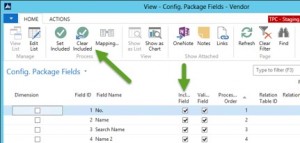
The one included field that remains checked is the No. field. This is the primary key field for this table and so cannot be unchecked. For some tables, there will be more than one field that is a key field and needs to remain checked, but NAV will manage this for you.
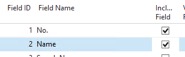
Now we need to start adding the fields that we want to include. To change the Included Field check box, first single-click on the “Include Field” box for the Name field. At this point it should look like the image below. (Notice that the area around the check box is a light blue color or lighter color than the rest of the line.)

Next double-click in that same box. The area around the box should turn white like the image below. Now the check box can be checked or unchecked.

Check the “Included Field” box next to Name. This can be helpful in knowing to whom that customer number is assigned.
To find the Payment Terms fields, we are going to filter the fields instead of hunting through the entire list. Go to the filter, change the filter column to Field Name and enter in “Payment Term” into the criteria.
![]()
This will filter the entire list of fields down to only two fields that have “Payment Term” in their name. The other fields are still there; they are just temporarily hidden while the filter is applied.
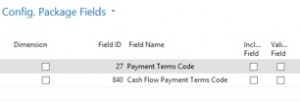
Please check the “Include Field” box for both of these fields.

You probably have noticed that the Validate Field box is also checked when checking Include Field. Validation makes sure that any values imported into NAV at the end of this process are valid. I suggest you always leave Validate Field checked for all included fields.
Once you have selected these two payment terms, click on the “OK” button in the lower right. Then click on “Refresh.” Notice for the Customer table, the value under No. of Fields Included is now 4. If there is another value here, that means a different quantity of fields has been selected. If the value under No. of Fields Included does not seem correct, then please review the selected fields.
Once the process for the Customer table has been completed, the configuration package should look like this:
That completes Steps 1 and 2. For next week’s blog post, we will cover Step 3: extract the file to Excel, save backup copies and update that file to add or update records.